
SLV Injector is a tunnelling software like HTTP Injector and you can use it to browse the internet for free.
On this page, we are going to show you how to create SVL Injector SSL/TSL config file. This config file is different from the TCP config where you need to tunnel over a proxy and port. And also, the SSL/TSL config makes use of the dropbear port which is 443, unlike the OpenSSH where you connect via port 22.
For this guide, we will walk you through the steps of creating an SSH account(STunnel) and how to use it to create an SSL/TSL config using an SNI.
Definition of some terminologies
SSH
The SSH protocol (also referred to as Secure Shell) is a method for secure remote login from one computer to another. It provides several alternative options for strong authentication, and it protects the communications security and integrity with strong encryption.


SSL/TSL
SSL, or Secure Sockets Layer, is an encryption-based Internet security protocol. It was first developed by Netscape in 1995 for the purpose of ensuring privacy, authentication, and data integrity in Internet communications. SSL is the predecessor to the modern TLS encryption used today.
Transport Layer Security(TSL), and its now-deprecated predecessor, Secure Sockets Layer, are cryptographic protocols designed to provide communications security over a computer network. Several versions of the protocols find widespread use in applications such as web browsing, email, instant messaging, and voice over IP
Dropbear SSH
Dropbear is a relatively small SSH server and client. It runs on a variety of POSIX-based platforms. Dropbear is open source software, distributed under an MIT-style license. Dropbear is particularly useful for “embedded”-type Linux (or other Unix) systems, such as wireless routers.
When using an SSH account via this type of server, you normally connect using port numbers 80, 443 or 444.
How to create SVL Injector SSL/TSL config step-by-step
Below we have described all the steps you need to follow when creating an SSL/TSL config for SVL Injector. With this configuration guide, Orange Cameroonian users will be able to create working config files and browse the internet for free.
Stage 1: Creating SSH SSL account(STunnel account)
The first step toward creating a working SVL Injector config file is creating an SSH account. We have previously written a post on the best websites to create fast SSH accounts. We will be using one of the sites there.
Site for SSH account
For this guide, we will be using freesslvpn to create our SSH account. From here, you can create 3,5,7 days and even 1months valid SSH account which can be used for both openSSH and STunnel connection.
Promoted contents:
- Who is the founder of BBC?
- Toshiba Corporation: Who is the founder of Toshiba?
- Google Releases Android 14 Beta 3, With Platform Stability and New Features
- Who founded Nokia? Here is all you need to know
- Who is the founder of HTC Corporation?
- Fast Charging and Multiple Variants: Samsung’s Galaxy Tab S9+ and Tab S9 Ultra Unveiled
- Who is the founder of Realme?
- The Mobvoi TicWatch 5 Pro has been launched
- Rumours of the Galaxy S23 FE: A budget-friendly variant of the Galaxy S23
- The upcoming iOS 17 will add the ability to use your locked iPhone as a smart display
Creating a 7 days valid SSH account from freesslvpn.us
- Visit freesslvpn.us and click on SSL/TSL SSH.


- The page containing different servers will now open. Select one of the servers which aren’t full and proceed.

- The next step will be creating a username and password for your SSH account. Fill in the username field and enter a password. Next, verify captcha and click on “create now”.

- Wait for a couple of seconds after you’ve clicked on the “create now” button. Your account will be created and the details displayed as show below. Copy the Host, username and password and save somewhere. Note that the SSL port is 443.

Stage 2: Configuring SVL Injector
The STunnel SSH account is used with a custom SNI. SNI(Server Name Identification) is an extension to the SSL standard which allows a client to specify a “name” for the resource it wants.
So, you will be needing an SNI. What you use here should be a webpage which is free for your local ISP or accessible after you’ve purchased a special social media bundle for example. A good example of such an SNI is v.whatsapp.net(Cameroonian Users who’ve subscribed to the OM deals Internet Bundle can use this)
How to add SNI and SSH account details to SVL Injector
Now that you know of a working SNI and have created your SSH account, it is time to use it and setup SVL Injector. Follow the steps below carefully;
- Download and install SVL Injector on your computer. Once installed, launch the software.
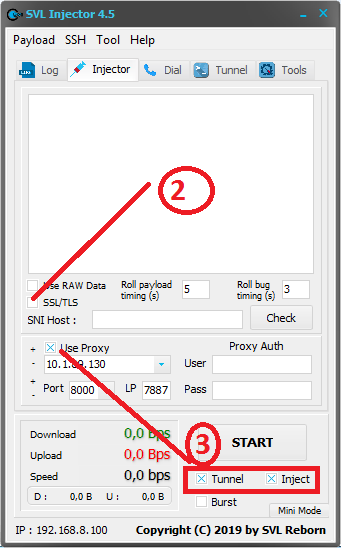
- When the SVL Injector opens, click on “Injector” and check “SSL/TSL” and uncheck “Use proxy”.

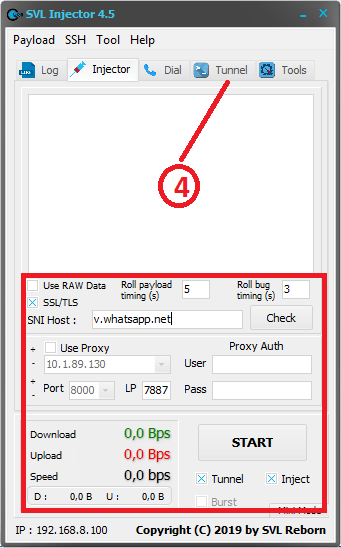
- After checking SSL/TSL and unchecking the “use proxy” option, enter the SNI Host. In our case, v.whatsapp.net. Make sure “Tunnel” and “Inject” options are also checked.
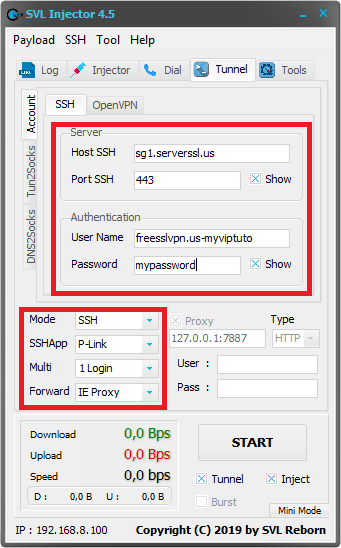
- Next, click on “Tunnel” to enter the SSH account details.
- Under the “Tunnel” option, fill in the details of your SSH account(Host, username, Host port and username password)
Stage 3: create SVL Injector SSL/TSL config – Exporting the config file
Now that you’ve created your SVL Injector config file, it is time to test it and then export it.
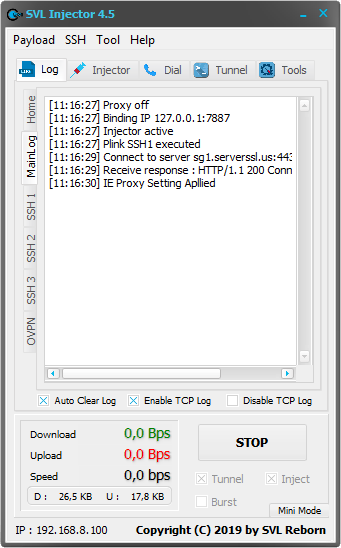
Click on the Log button, then Main Log. Now to test your config, click the “START” button. If it connects, then you should have a screen like the one below.
Mine doesn’t connect!
ONce you’ve confirmed that you SVL Injector settings are all correct and the connection was successful, you can now export the config which can be shared.
Follow the steps below to export config as one file;
- Click on the “Payload” tab and choose “Save”.

- You will then see a popup screen with different options. You can lock the payload and set expiry if you like. Also, you have the option to add the config creator username. And one thing you shouldn’t forget is to check the “Save SSH data” box so that the config will combine the payload and SSH account details.


Save the config file after filling all the necessary fields. You can then share it after with friends where they will need to import it in order to use it by simply double-clicking on it.
Recommended for you:


