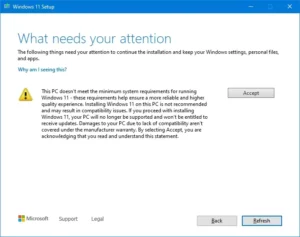
How to enable TPM 2.0 on your PC for Windows 11 installation? As you all may know, TPM 2.0 is today one of the prerequisites for the installation of Windows 11 on any computer.
So, if you know your computer is compatible with Windows 11 and is not currently enabled with TPM 2.0 or their PC is capable of running TPM 2.0 but is not set up this guide is for you.
Most PCs that have shipped in the last 5 years are capable of running Trusted Platform Module version 2.0 (TPM 2.0).
The TPM for Trusted Platform Module is a security solution, a chip that is on your computer’s motherboard. Most of the time it is soldered to the motherboard, but it is also possible to buy a TPM module.


It generates encryption keys, keeping part of the key to itself. For example on BitLocker, part of the key can be stored in the TPM itself, rather than just on disk. This means that an attacker cannot simply recover the computer disk and attempt to access its files elsewhere.
How to check that the TPM 2.0 is activated on your computer
In some cases, PCs that are capable of running TPM 2.0 are not set up to do so. If you are considering upgrading to Windows 11, check to ensure TPM 2.0 is enabled on your device. Most retail PC motherboards are used by people building their own PC, for example, ships with TPM turned off by default even though it is almost always available to be enabled.
Now to check that TPM is enabled on your computer, you have to proceed thus;
- Press [Windows Key] + R or select Start > Run and type in the code below and hit the Enter key.
tpm.msc
- If you see a message saying a “Compatible TPM cannot be found,” your PC may have a TPM that is disabled (you will have to enable TPM 2.0 on your PC from BIOS) or doesn’t have any TPM Chip. And if it

- On the otherhand, if you see a message confirming TPM is ready to use, check Specification Version under TPM Manufacturer Information to verify it is 2.0. If it is less than 2.0 your device does not meet the Windows 11 requirement.
How to enable TPM 2.0 on your PC for Windows 11 installation
If you need to enable TPM for Windows 11 installation, these settings are managed via the UEFI BIOS (PC firmware) and vary based on your device. You can access these settings by choosing: Settings > Update & Security > Recovery > Restart now.
From the next screen, choose to Troubleshoot > Advanced options > UEFI Firmware Settings > Restart to make the changes. These settings are sometimes contained in a sub-menu in the UEFI BIOS labeled Advanced, Security, or Trusted Computing.
Promoted contents:
- Who is the founder of BBC?
- Toshiba Corporation: Who is the founder of Toshiba?
- Google Releases Android 14 Beta 3, With Platform Stability and New Features
- Who founded Nokia? Here is all you need to know
- Who is the founder of HTC Corporation?
- Fast Charging and Multiple Variants: Samsung’s Galaxy Tab S9+ and Tab S9 Ultra Unveiled
- Who is the founder of Realme?
- The Mobvoi TicWatch 5 Pro has been launched
- Rumours of the Galaxy S23 FE: A budget-friendly variant of the Galaxy S23
- The upcoming iOS 17 will add the ability to use your locked iPhone as a smart display
The option to enable the TPM may be labeled Security Device, Security Device Support, TPM State, AMD fTPM switch, AMD PSP fTPM, Intel PTT, or Intel Platform Trust Technology.
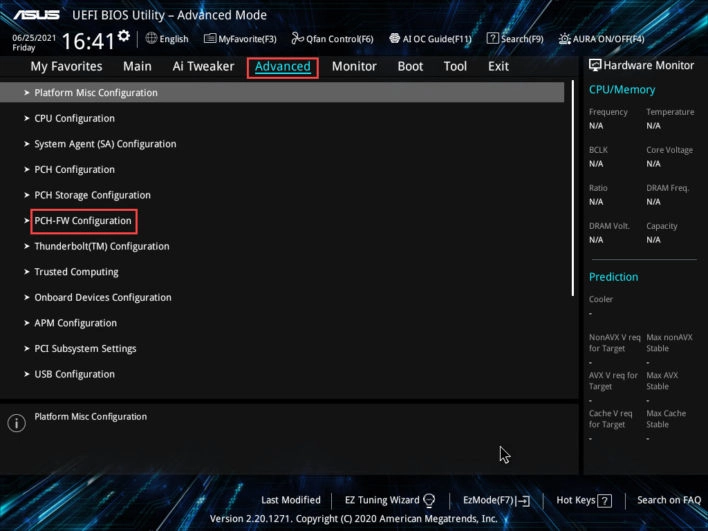
Let’s take the case of a compatible Asus laptop.
Here is how it works on my motherboard, from the advanced menu, you have to access the “PCH-FW Configuration” function.
- From the Advanced Menu in the BIOS, select “PCH-FW Configuration”
- Now on the Next screen, select “Trusted Computing”.
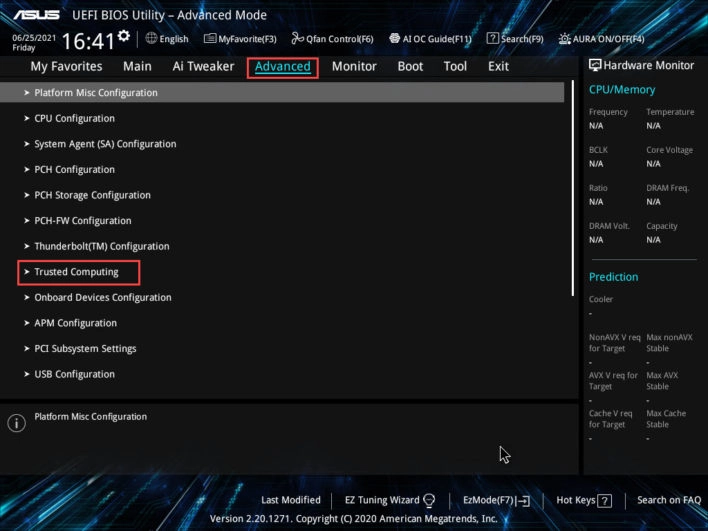
- Next, to enable TPM 2.0 on your PC, select TCG_2 for the “ TPM2.0 UEFI Spec Version ” option
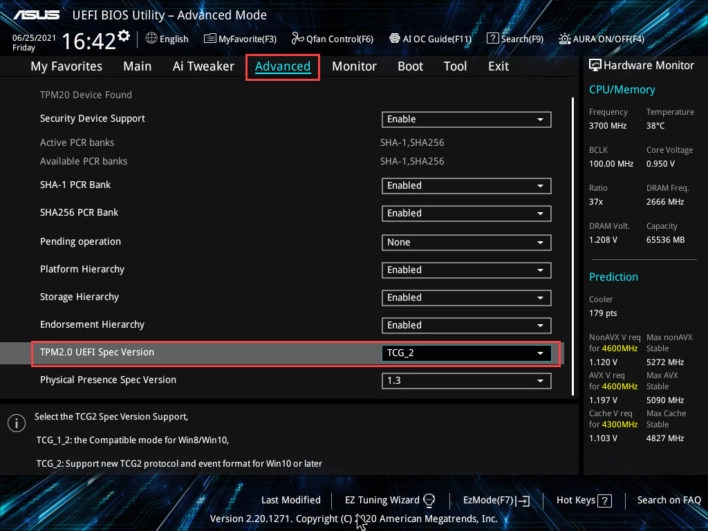
- Save the settings and exit. Done!
You can find more helpful guides on how to enable TPM 2.0 for your specific computers from the following links.
Microsoft Surface
Recommended for you: